Introduction
![]()
Welcome to the Sandhole book. This is a guide on how to install, configure, and use an instance of Sandhole.
About the project
Sandhole is an unconventional reverse proxy which uses the built-in reverse port forwarding from SSH, allowing services to expose themselves to the Internet with minimal configuration. This is especially useful for services behind NAT, but you may also use Sandhole for:
- Quickly prototyping and sharing websites or APIs.
- Exposing endpoints or ports on IoT devices, game servers, and other applications.
- Hosting a dual-stack HTTP+SSH service (via ProxyJump), such as a Git instance.
- Handling a multi-tenant network with several websites and users.
- Using the tunnel for ad hoc peer-to-peer connections, or even as a basic VPN.
- And possibly more!
Fun fact: the Sandhole book runs behind a Sandhole instance!
Technical overview
This page goes over the technical details about Sandhole’s inner workings. Feel free to skip this page if you are only interested in using Sandhole.
Secure Shell
SSH is a powerful protocol, with built-in features such as encryption and authentication. It’s widely used to access remote servers, in order to get access to a shell or transfer Git repositories, for example.
One of its less known features is the ability to forward ports between the client and the server. With an OpenSSH server, it’s possible to do:
- Local port forwarding: Accessing a port from the server, as if it were a local service on your machine.
- Remote port forwarding: Exposing a port from a local service to the server, as if it were a remote service running on the server.
See this post on SSH tunneling for more information.
Sandhole is capable of handling both, albeit in a different way than a regular OpenSSH server.
Reverse proxy
A reverse proxy is an intermediary server that receives and forwards requests to a backend service. They are commonly used to secure traffic, or expose servers behind a firewall/private network.
Sandhole is itself a reverse proxy. It leverages SSH for authentication and tunneling of services, while transparently handling client requests.

As such, it’s possible to expose services publicly without needing a VPN, even when the private server is behind NAT or firewalls.
Example flow
Let’s say that client A wishes to expose a local service, running on port 8080, to the Internet.

- Client A connects to a Sandhole instance while requesting a remote port forwarding:
ssh -p 2222 -R mytunnel:80:localhost:8080 sandhole.com.br
-
Sandhole handles the forwarding request and starts proxying requests from
http://mytunnel.sandhole.com.brto client A’s port 8080. -
Client B accesses
http://mytunnel.sandhole.com.brthrough a web browser. -
Sandhole opens a tunneling channel over SSH to client A, simulating a TCP stream containing client B’s request.
-
Client A’s HTTP server replies over the SSH channel.
-
Sandhole forwards the reply to client B.
To client A, requests arrive normally at the socket, despite only having an outbound SSH connection; to client B, Sandhole transparently acts as if it were the service itself.
Here’s the same flux in a sequence diagram:

Quick start
In order to run Sandhole, you’ll need:
- A server with at least one public address. This tutorial assumes that you’re using Linux.
- Control over a domain name (for example,
sandhole.com.br) and its subdomains (*.sandhole.com.br).
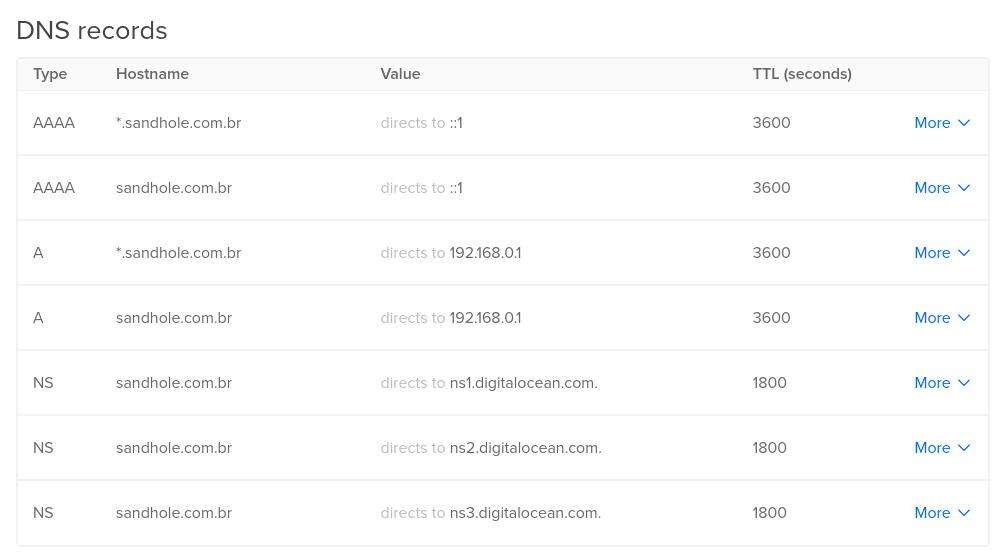
1. Configure your DNS
Make sure to point the A and AAAA records to your server’s IP address(es). If you intend to use Agnos (recommended), also set an NS record for _acme-challenge.sandhole.com.br to agnos-ns.sandhole.com.br (or any other domain that will reach your Sandhole instance).
How to set up your DNS records depends on your choice of DNS provider. For example, on DigitalOcean, this is what the configuration might look like:
2. Get the executable
Download a copy of the latest release:
# x64
wget --output-document sandhole https://github.com/EpicEric/sandhole/releases/latest/download/sandhole-linux-amd64

# -- OR --

# AArch64
wget --output-document sandhole https://github.com/EpicEric/sandhole/releases/latest/download/sandhole-linux-arm64
If you prefer, you may also use Docker Compose (recommended), NixOS, or compile the binary yourself.
3. Run Sandhole
You can now run Sandhole! Just make sure that it points to your domain:
chmod +x ./sandhole
./sandhole --domain sandhole.com.br
By default, this will expose ports 80 (for HTTP), 443 (for HTTPS), and 2222 (for SSH). If it all succeeds, you should see the following:
2025-06-07T02:34:01.346654097+00:00  INFO sandhole: Starting Sandhole...
2025-06-07T02:34:01.347502369+00:00  INFO sandhole: Key file not found. Creating...
2025-06-07T02:34:01.351344652+00:00  INFO sandhole: Listening for HTTP connections on port 80.
2025-06-07T02:34:01.351376882+00:00  INFO sandhole: Listening for HTTPS connections on port 443.
2025-06-07T02:34:01.351420152+00:00  INFO sandhole: Listening for SSH connections on port 2222.
2025-06-07T02:34:01.351424230+00:00  INFO sandhole: Sandhole is now running.
Now you’re ready to dig sandholes like a crab! 🦀
4. Next steps
Once Sandhole is up and running, you should:
- Set up authentication - Add SSH public keys for users and admins.
- Configure services - Use SSH tunneling to expose your first service.
- Customize settings - Adjust configuration options for your deployment.
- Access admin interface - Connect via SSH as an admin user for system management.
Using Docker Compose
The most straightforward way to have Sandhole up and running is with Docker Compose. Mainly, this takes care of managing TLS for you, and also daemonizes your application.
For this, you’ll first need to install the Docker Engine on your server.
An example configuration is provided in the repository’s docker-compose-example/sandhole directory, using sandhole.com.br as the example domain. Copy the compose.yml and config.toml files to the desired directory, and adjust them as necessary.
Then, simply run:
docker compose up -d
# ... which is shorthand for:
docker compose up --detach
You should also re-run this command whenever you make changes to your configuration and/or after you update to the latest image (docker compose pull). See the official Docker Compose documentation for more information.
An alternate configuration using dnsrobocert is available under docker-compose-example/sandhole-dnsrobocert in the repository.
Compiling from source
To build the project, Cargo and Rust must be installed.
If you’re compiling from a separate workstation than the one that will be running Sandhole, then grab the source files, build the binary, and copy it over:
git clone https://github.com/EpicEric/sandhole
cd sandhole
cargo build --locked --release
scp target/release/sandhole user@sandhole.com.br:/usr/local/bin/sandhole
If you’re compiling on the machine where you’ll run Sandhole, you can install it directly with cargo install.
# Install from latest release
cargo install --locked sandhole
#
# -- OR --
#
# Install the current development version
cargo install --locked --git https://github.com/EpicEric/sandhole
Cargo should automatically add the binary to your PATH.
Finally, make sure to configure a TLS provider.
NixOS
Sandhole is available as a flake, containing an overlay and a NixOS service.
Setup
You can install the NixOS module for the following pinning solutions (click to expand):
-
Flake
# flake.nix { inputs = { # ... sandhole.url = "github:EpicEric/sandhole/main"; }; outputs = { nixpkgs, sandhole, ... }@inputs: { nixosConfigurations."your-hostname" = nixpkgs.lib.nixosSystem { specialArgs = { inherit inputs; }; modules = [ # ... sandhole.nixosModules.sandhole ]; }; }; } -
tack
tack add sandhole github:EpicEric/sandhole --fetch# configuration.nix let inputs = import ./.tack; in { imports = [ # ... (import "${inputs.sandhole}/module.nix" { }) ]; } -
npins
npins add github EpicEric sandhole# configuration.nix let sources = import ./npins; in { imports = [ # ... (import "${sources.sandhole}/module.nix" { }) ]; }
Here’s an example configuration.nix with Sandhole and Agnos. You can find full options in the NixOS module options page:
{
  pkgs,
  ...
}:

let
  # Add admin keys to this link farm
  adminKeys = pkgs.linkFarm "sandhole-admin-keys" [
    {
      name = "example-admin.pub";
      path = pkgs.writeText "example-admin.pub" ''
        ssh-ed25519 AAAAC3NzaC1lZDI1NTE5AAAAIPH3e5SFdwLOuleypjfgauqEUAmgpm9r8lqfvc6G1o1D example-admin
      '';
    }
  ];

  # Add user keys to this link farm
  userKeys = pkgs.linkFarm "sandhole-user-keys" [
    {
      name = "example-user.pub";
      path = pkgs.writeText "example-user.pub" ''
        ssh-ed25519 AAAAC3NzaC1lZDI1NTE5AAAAIOtH7kS+q8/8TXWAp4OJvRh/7GNkQ6FR/QBOhGJuEwEC example-user
      '';
    }
  ];

  admin-keys-directory = "/etc/sandhole/admin-keys";
  user-keys-directory = "/etc/sandhole/user-keys";
  certificates-directory = "/var/lib/sandhole/certificates";
in
{
  # ...

  # By symlinking the SSH key directories to /etc,
  # Sandhole doesn't have to restart when modifying keys
  environment.etc = {
    "sandhole/admin-keys".source = adminKeys;
    "sandhole/user-keys".source = userKeys;
  };

  # Configurations for Sandhole
  services.sandhole = {
    # Install the Sandhole package and enable the systemd service
    enable = true;
    # Let Sandhole manage the firewall and open ports from its configuration.
    # Note: If `disableTcp` is `false` (default), it will open all ports >= 1024
    openFirewall = true;
    # These are the same CLI options from Sandhole, except without leading hyphens.
    # See: http://sandhole.com.br/cli.html
    # Make sure to change at least `domain` and `acme-contact-email` below
    settings = {
      domain = "sandhole.com.br";
      acme-contact-email = "admin@sandhole.com.br";
      disable-tcp = true;
      force-https = true;
      inherit
        admin-keys-directory
        user-keys-directory
        certificates-directory
        ;
    };
  };

  security.agnos = {
    enable = true;
    temporarilyOpenFirewall = true;
    user = "sandhole";
    generateKeys.enable = true;
    settings =
      {
        dns_listen_addr = "[::]:53";
        accounts =
          [
            {
              # Change this to your e-mail address
              email = "admin@sandhole.com.br";
              private_key_path = "./letsencrypt_key.pem";
              certificates =
                [
                  {
                    # Change these from `sandhole.com.br` to your domain
                    domains = [ "sandhole.com.br" "*.sandhole.com.br" ];
                    fullchain_output_file = "${certificates-directory}/sandhole.com.br/fullchain.pem";
                    key_output_file = "${certificates-directory}/sandhole.com.br/privkey.pem";
                  }
                ];
            }
          ];
      };
  };
}
You can then connect services with the provided keys. For example, to use a Vaultwarden NixOS container in the same machine:
{
  lib,
  ...
}:
{
  # ...

  networking.nat = {
    enable = true;
    internalInterfaces = ["ve-+"];
    externalInterface = "eno0"; # Change to the appropriate WAN interface
    enableIPv6 = true;
  };

  # Example: Setting up Vaultwarden
  containers.vaultwarden = {
    autoStart = true;
    privateNetwork = true;
    hostAddress = "192.168.102.1";
    localAddress = "192.168.102.2";
    hostAddress6 = "fc00::2:1";
    localAddress6 = "fc00::2:2";
    extraFlags = [ "-U" ];
    config =
      { lib, ... }:
      {
      services.vaultwarden = {
        enable = true;
        config = {
          DOMAIN = "https://vaultwarden.sandhole.com.br";
          SIGNUPS_ALLOWED = false;
          ROCKET_ADDRESS = "::";
          ROCKET_PORT = 8222;
          ROCKET_LOG = "warning";
        };
      };

      networking = {
        firewall.allowedTCPPorts = [ 8222 ];
        useHostResolvConf = lib.mkForce false;
      };

      services.resolved.enable = true;

      system.stateVersion = "25.11";
    };
  };

  # Proxy Vaultwarden to the local Sandhole instance
  services.autossh.sessions = [
    {
      name = "vaultwarden";
      user = "root";
      # Change the arguments as necessary
      extraArguments = ''
        -i /path/to/ssh/key/example-user \
        -o StrictHostKeyChecking=accept-new \
        -o ServerAliveInterval=30 \
        -R vaultwarden.sandhole.com.br:80:192.168.102.2:8222 \
        -p 2222 \
        127.0.0.1
      '';
    }
  ];
}
Binary caching
In order to avoid re-building Sandhole for each update, you can use either of Sandhole’s binary caches. In configuration.nix:
{
  # ...

  nix.settings = {
    substituters = [
      "https://cache.eric.dev.br"
      "https://sandhole.cachix.org"
    ];
    trusted-public-keys = [
      "cache.eric.dev.br-1:szEyq5LCjxDCUHYSRaSFU5HdHmR7QlT+FRG3tB9QtpE="
      "sandhole.cachix.org-1:cZadr6kgjQcRvsr++Nv9kgtMOrbLahiZBpuI9WpIXvA="
    ];
  };
}
TLS support
Sandhole supports TLS signing out of the box, including ACME challenges via TLS-ALPN-01 for custom domains.
However, especially for your main domain (eg. *.sandhole.com.br), it’s recommended that you set up a tool for wildcard certification via DNS. Here are some options supported by Sandhole:
- For Agnos, Sandhole requires certificates to live in
./<root dir>/<some name>/fullchain.pemand their respective keys in./<root dir>/<some name>/privkey.pem- for example,./agnos/sandhole.com.br/fullchain.pemand./agnos/sandhole.com.br/privkey.pem. In this case, Sandhole can access the certificates via:
sandhole --domain sandhole.com.br --certificates-directory ./agnos
- For dnsrobocert, Sandhole matches its format directly. Assuming that the output of dnsrobocert is in
./letsencrypt, Sandhole can access the certificates via:
sandhole --domain sandhole.com.br --certificates-directory ./letsencrypt/live
ACME support
ACME allows you to generate certificates for user-provided domains automatically, without having to edit your configuration for each one.
Adding ACME support is as simple as adding your contact e-mail address via --acme-contact-email you@your.email.com, but first, make sure that you agree to the Let’s Encrypt Subscriber Agreement. Sandhole will automatically manage the cache for your account and any certificates generated this way.
Configuration
This is a list of the most important settings to be aware of. For a comprehensive list, refer to the CLI options.
Adding users and admins
In order to do anything useful with Sandhole, connections must be authenticated. The main way of doing this is by adding your users’ public keys to the user keys directory.
By default, this will be ./deploy/user_keys/, but it can be configured with the --user-keys-directory option. Once you add a public key, Sandhole will automatically pick up on the change, and allow that user to create remote port forwardings.
Similarly, there is a ./deploy/admin_keys/ directory (set by --admin-keys-directory), for users who should also have access to the admin interface and no quota restrictions.
User permissions
Users with unrecognized SSH keys are still allowed to connect, in order to perform local forwarding to user-provided services. As such, these are the possible types of authentication:
| Authentication type | Connection method(s) |
|---|---|
| None | Public key |
| User | Password1 or public key |
| Admin | Public key |
1 Optional password authentication with a login API.
And these are each of their capabilities:
| Authentication type | Local forwarding (proxy) | Remote forwading (reverse proxy) | Admin interface access |
|---|---|---|---|
| None | ✅ | ❌ | ❌ |
| User | ✅ | ✅2 | ❌ |
| Admin | ✅ | ✅ | ✅ |
2 Remote forwarding by users is subject to restrictions, such as service quotas and rate limiting.
Default ports
By default, Sandhole runs on ports 80, 443, and 2222. This assumes that your actual SSH server is running on port 22, and that no other services are listening on the HTTP/HTTPS ports.
However, it might be desirable to have Sandhole listen on port 22 instead. In order to keep your OpenSSH server running on a different port, edit the Port entry in /etc/ssh/sshd_config, then restart your SSH daemon.
Now you’ll be able to run Sandhole on port 22:
sandhole --domain server.com --ssh-port 22
Similarly, you can change the port for the HTTP and HTTPS services, but note that using HTTPS on a port other than 443 will disable ACME challenges.
Allow binding on any subdomains/ports
Without extra configuration, Sandhole will not let users bind to requested subdomains and ports, and will always allocate a random one instead.
If you wish to change the default behavior, and allow users to provide their own subdomains/ports to bind to, add the options --allow-requested-subdomains and --allow-requested-ports, respectively.
Otherwise, if you wish the subdomains to still be random, but persist between requests/disconnections, check out the --random-subdomain-seed option in the command-line interface.
Allow connecting to SSH via the HTTPS port
In some networks, outbound connections to 22 (or 2222) may be blocked by the operators. In Sandhole, it’s possible to get around this with the --connect-ssh-on-https-port option.
Once you have configured it, users can then expose their services with the -p 443 option:
ssh -R example:80:localhost:3000 sandhole.com.br -p 443
Alternative authentication with password
In some scenarios, it makes more sense to authenticate users dynamically with a password, rather than manually adding public keys to a directory.
In order to support this, you can provide a URL to --password-authentication-url. This should be running an HTTP or HTTPS service, which must accept a JSON POST request containing the user’s credentials as follows:
{
  "user": "eric",
  "password": "super$ecret123",
  "remote_address": "[::ffff:10.0.5.32]:12703" // std::net::SocketAddr
}
Any 2xx status will signify a successful authentication.
Restricting resources for users
Service quotas
By default, users are able to bind as many services as they want. In order to limit this amount, Sandhole provides the --quota-per-user option, which must be a number greater than 0. The user’s quota includes all services across HTTP, SSH, and TCP.
To enforce this quota across multiple connections, Sandhole considers a unique user to be any number of forwardings sharing the same public key. In the case of password-authenticated users, their username will be considered instead.
The quota is not enforced for admin users.
Rate limiting
You may also specify a rate limit on a user’s combined services with the --rate-limit-per-user option, by passing the maximum amount of bytes per second such as 1MB.
Read the section above on how Sandhole determines what is a unique user across multiple connections.
Rate limiting is not enforced for admin users.
Profanity filtering
It’s possible to disallow profanities from being generated by the random address assignment with the --random-subdomain-filter-profanities option. This applies to HTTP hosts and aliases.
You can also disable profanities from being requested with the --requested-domain-filter-profanities option, which may lead to false positives being denied.
Administration
Sandhole has a couple of SSH-based options for administrators to interact with and monitor their Sandhole instance.
Admin interface
Sandhole comes with a command-line admin interface available through SSH, which displays information about the system and proxied connections. In order to access it, you must be a user with admin credentials.
To access it, simply run the command:
ssh -p 2222 -t sandhole.com.br admin
where sandhole.com.br is your hostname and 2222 is Sandhole’s SSH port.
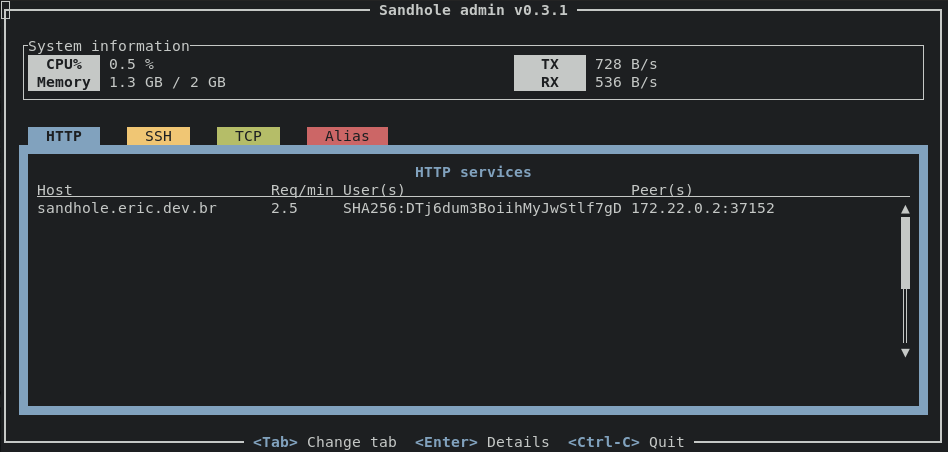
Via the admin interface, it’s possible to see basic metrics, inspect services, and remove users.
Admin-only aliases
Sandhole also has built-in functionality that exposes sensitive endpoints via local forwarding. Only users with administrative capabilities are able to alias to them.
All of them follow the naming convention <service>.sandhole:10, and can be found in the aliasing tab of the admin interface. Note that remote forwarded aliases are not allowed to use port 10 for this reason.
These are the available admin-only aliases:
- prometheus.sandhole:10 exposes a single Prometheus endpoint at the root, for integrating telemetry data with monitoring dashboards.
Exposing your first service
Once you have an authorized public key in Sandhole, you can expose a local service. Assuming that your local HTTP service is running on port 3000, and that Sandhole is listening on sandhole.com.br:2222, all you have to do is run:
ssh -i /your/private/key -p 2222 -R 80:localhost:3000 sandhole.com.br
Yep, that’s it! Sandhole will log that HTTP is being served for you on a certain subdomain, and you can access the URL printed to the console to see that your service is available to the public.
You’ll also receive logs about each incoming HTTP request if the administrator hasn’t disabled the logging option.
Requesting multiple tunnels
You can request tunnels for several services in a single SSH command.
ssh -i /your/private/key -p 2222 -R 80:localhost:3000 -R 80:localhost:4000 -R 22:localhost:5000 sandhole.com.br
Requesting a particular subdomain/port
After the server owner allows binding on any subdomain/port, it’s possible to configure which will be assigned to you.
For example, to bind under test.sandhole.com.br, we could use either of these commands:
ssh -i /your/private/key -p 2222 -R test:80:localhost:3000 sandhole.com.br
#
# -- OR --
#
ssh -i /your/private/key -p 2222 -R test.sandhole.com.br:80:localhost:3000 sandhole.com.br
And if we’d like to bind to a specific TCP port, say 4321:
ssh -i /your/private/key -p 2222 -R 4321:localhost:3000 sandhole.com.br
#
# -- OR --
#
ssh -i /your/private/key -p 2222 -R localhost:4321:localhost:3000 sandhole.com.br
Connecting with user + password
If you’d like to connect with a password instead of your public key, make sure that password authentication has been enabled by the administrator, then run:
ssh -p 2222 -o PubkeyAuthentication=no -o PreferredAuthentications=password username@sandhole.com.br ...
Automatic reconnection
If you’d like to have persistent tunnels, use a tool like autossh to automatically reconnect when disconnected. Note that you might be assigned a new subdomain or port through disconnects, depending on the server configuration.
For a container-based alternative, check out the Docker Compose example in the repository.
Local forwarding and aliasing
In addition to remote port forwarding, Sandhole also supports local port forwarding by default. This allows you to create SSH-based tunnels to connect to a service.
Given a remote service running as:
ssh -p 2222 -R my.tunnel:3000:localhost:2000 sandhole.com.br
Note that the server won’t listen on port 3000; the service will instead alias to my.tunnel. You can establish a local forward to the port from your machine:
ssh -L 4000:my.tunnel:3000
Then you can access localhost:4000, and all traffic will be redirected to port 2000 on the remote service. It’s almost like a VPN!
Enforcing aliasing
Aliasing is always enabled for SSH hosts, and is conditionally enabled for TCP hosts that have requested an address other than localhost.
To enable aliasing for HTTP hosts, pass the tcp-alias command to the remote forwarding command as follows:
ssh -p 2222 -R my.tunnel:80:localhost:8080 sandhole.com.br tcp-alias
Restricting access to local forwardings
If you’d like to restrict which users can access your service, you can provide the allowed fingerprints as a comma-separated list at the end of the command, like so:
ssh -p 2222 -R my.tunnel:3000:localhost:2000 sandhole.com.br allowed-fingerprints=SHA256:GehKyA21BBK6eJCouziacUmqYDNl8BPMGG0CTtLSrbQ,SHA256:bwf4FDtNeZzFv8xHBzHJwRpDRxssCll8w2tCHFC9n1o
These fingerprints may belong to keys unrecognized by Sandhole, and they’ll still be able to connect to your tunnel.
This option will also enforce aliasing for HTTP hosts.
Custom domains
You can also use your custom domains with Sandhole. For this, you’ll need your SSH key’s fingerprint and control over your domain’s DNS.
For the former, you can run ssh-keygen -lf /path/to/private/key and take note of the second field - it will look something like:
SHA256:bwf4FDtNeZzFv8xHBzHJwRpDRxssCll8w2tCHFC9n1o
Then, add the following entries to your DNS server (assuming that your custom domain is my.domain.net):
| Type | Domain | Data |
|---|---|---|
| CNAME |
my.domain.net |
sandhole.com.br |
| TXT |
_sandhole.my.domain.net |
SHA256:bwf4FDtNeZzFv8xHBzHJwRpDRxssCll8w2tCHFC9n1o |
This instructs your DNS server to redirect requests to Sandhole, and tells Sandhole to authorize your SSH key for the given domain, respectively.
If you need to allow multiple keys for the same domain, simply add a TXT record for each one.
Then, expose your service at the given domain:
ssh -p 2222 -R my.domain.net:80:localhost:3000 sandhole.com.br
HTTPS support for custom domains
If your administrator has configured ACME support, you don’t need any extra steps to enable HTTPS support. It will be automatically provisioned for your custom domain.
However, if you require DNS challenges for your domain’s certification for any reason, and your administrator is running Agnos, you can simply set another DNS entry:
| Type | Domain | Data |
|---|---|---|
| NS |
_acme-challenge.my.domain.net |
agnos-ns.sandhole.com.br |
This lets Agnos manage the ACME challenge for you, as long as the admin updates Agnos’s configuration with your domain.
UDP-over-TCP (experimental)
Sandhole has experimental support for UDP over SSH, with a thin TCP-based protocol.
Provided that the Sandhole instance that you wish to connect to has UDP enabled, the quickest way to get UDP running is with the udp_over_tcp.py client provided in the Sandhole repository:
wget https://raw.githubusercontent.com/EpicEric/sandhole/refs/heads/main/udp_over_tcp.py
python3 udp_over_tcp.py --udp-port 12345 --tcp-port 6789
This will create a TCP server listening on port 6789 which proxies UDP-over-TCP data to port 12345.
Alternatively, for better performance, a Rust version can be installed and run with:
cargo install --locked sandhole_udp_over_tcp
sandhole_udp_over_tcp --udp-port 12345 --tcp-port 6789
In order to create an UDP socket on port 9999 of Sandhole, use the reserved udp.sandhole remote host:
ssh -p 2222 -R udp.sandhole:9999:localhost:6789 sandhole.com.br
Make sure that you’re pointing to the local TCP port created from the script above.
Local forwarding
You can also local-forward with the same script by passing the --local-forwarding flag. For example, you might forward the connection above (UDP port 9999) as:
python3 udp_over_tcp.py --udp-port 33333 --tcp-port 4000 --local-forwarding
# -- or --
sandhole_udp_over_tcp --udp-port 33333 --tcp-port 4000 --local-forwarding
ssh -p 2222 -L 4000:udp.sandhole:9999 sandhole.com.br
Then you can point your UDP client to localhost:33333.
Technical details
Since UDP is a protocol based on datagrams, the only extra information added by the translation layer is the number of bytes in the datagram, to ensure that it’s reassembled correctly on both ends even if TCP splits or merges data.
State is handled by associating each UDP socket with an SSH forwarding channel. As such, a compatible client can translate TCP listeners to UDP socket connections one-to-one.
Limitations
Common issues associated with UDP-over-TCP (increased latency and jitter, TCP Meltdown) apply to Sandhole as well.
Advanced options
There are multiple options that you can pass to Sandhole when requesting a remote forwarding, such as via OpenSSH’s CLI. You can also combine them by passing them in a single command, separated by spaces. Here is a list of the options with examples:
allowed-fingerprints
This option requires certain SSH key fingerprints for aliasing. See “Restricting access to local forwardings”.
ssh -p 2222 -R my.tunnel:3000:localhost:2000 sandhole.com.br allowed-fingerprints=SHA256:GehKyA21BBK6eJCouziacUmqYDNl8BPMGG0CTtLSrbQ,SHA256:bwf4FDtNeZzFv8xHBzHJwRpDRxssCll8w2tCHFC9n1o
force-https
This option forces proxied HTTP requests to be redirected to HTTPS.
ssh -p 2222 -R my.tunnel:80:localhost:8080 sandhole.com.br force-https
host
This option tells Sandhole to modify the Host header in proxied HTTP requests to use the provided host.
ssh -p 2222 -R my.tunnel:80:localhost:8080 sandhole.com.br host=some.host
http2
This option tells Sandhole to serve HTTP/2 instead of HTTP/1.1 for your service. This option only works over HTTPS, so you may want to also set force-https.
ssh -p 2222 -R my.tunnel:80:localhost:8080 sandhole.com.br http2 force-https
ip-allowlist / ip-blocklist
These options allow you to limit the IP ranges for incoming proxy/alias connections.
ssh -p 2222 -R website.com:80:localhost:3000 sandhole.com.br ip-allowlist=10.0.0.0/8,20ff::/16 ip-blocklist=10.1.0.0/16
pool
This option allows you to reduce the maximum number of connections created for each of your handlers. It must not be larger than the server’s --pool-size option.
ssh -p 2222 -R my.tunnel:80:localhost:8080 sandhole.com.br pool=16
sni-proxy
This option tells Sandhole that it should use your provided TLS backend. This guarantees that Sandhole cannot see unencrypted traffic. This option only works over HTTPS, so you may want to also set force-https.
ssh -p 2222 -R my.tunnel:80:localhost:8080 sandhole.com.br sni-proxy force-https
tcp-alias
This option forces an HTTP remote forwarding request to be an alias instead of a proxy. See “Enforcing aliasing”.
ssh -p 2222 -R my.tunnel:80:localhost:8080 sandhole.com.br tcp-alias
Frequently asked questions
How do I expose my service on multiple custom domains (such as example.com and www.example.com)?
ssh -p 2222 -R example.com:80:localhost:3000 -R www.example.com:80:localhost:3000 sandhole.com.br
How do I connect to a forwarded SSH server?
Use ssh -p 2222 -J sandhole.com.br:2222 mysshserver.com (replace the ports with Sandhole’s SSH port if not using the default 2222).
If you’d like to avoid typing out the proxy jump command every time, edit your SSH config file (usually ~/.ssh/config) and add the following entry (changing the port where appropriate):
Host mysshserver.com
	ProxyJump sandhole.com.br:2222
	Port 2222
How do I enable Websockets?
Websockets are always enabled for HTTP services.
Can I expose UDP services (like HTTP/3)?
See UDP-over-TCP.
How do I retrieve proxy information for my HTTP service?
You can use the standard proxy headers set by Sandhole:
X-Forwarded-For: Client IP address.X-Forwarded-Host: Original hostname header.X-Forwarded-Proto: Protocol (httporhttps).X-Forwarded-Port: Proxy port number.
What if I need to run another HTTP/HTTPS service on the machine instead of Sandhole?
It’s simple: just let Sandhole take care of that for you! Nothing stops you from connecting to Sandhole on localhost, and just like any reverse proxy, it will redirect the traffic appropriately for you.
How do I squeeze out more performance?
If both client and server support hardware instructions for AES (i.e. most x64 processors), you should prefer the AES-GCM cipher by passing the -c aes256-gcm@openssh.com flag to your OpenSSH client, as it’s generally faster. For ARM processors running a modern version of OpenSSH, -c chacha20-poly1305@openssh.com might be the faster cipher out of the two options.
Another option is to use compression for HTTP services (such as gzip), in order to reduce the amount of data that has to be encrypted.
How do I disable HTTP/TCP/aliasing?
With the --disable--http, --disable-tcp, and --disable-aliasing CLI flags respectively. Note that you cannot disable all three at once, as that would remove all of Sandhole’s functionality. You can also disable HTTPS and SNI with --disable-https and --disable-sni, respectively.
How do I prevent multiple services from load-balancing?
With the --load-balancing=deny or --load-balancing=replace CLI flag.
How do I force HTTP requests to get redirected to HTTPS?
You may do so globally with the --force-https CLI flag, or per service by passing force-https on the tunneling connection.
How do I allow/block certain IP ranges?
You may do so globally with the --ip-allowlist and --ip-blocklist CLI flags respectively, or per service by passing ip-allowist=... and/or ip-blocklist=... on the tunneling connection.
Command-line interface options
Sandhole exposes several options, which you can see by running sandhole --help.
Expose HTTP/SSH/TCP services through SSH port forwarding.

Usage: sandhole [OPTIONS] <--domain <DOMAIN>|--no-domain|--completions <COMPLETIONS>>


Options:
      --domain <DOMAIN>
          The root domain of the application

      --no-domain
          Whether to run Sandhole without a root domain.

          This option disables subdomains.

      --completions <COMPLETIONS>
          Generate shell completions for Sandhole

          [possible values: bash, elvish, fish, powershell, zsh]

      --domain-redirect <URL>
          Where to redirect requests to the root domain

          [default: https://github.com/EpicEric/sandhole]

      --user-keys-directory <DIRECTORY>
          Directory containing public keys of authorized users. Each file must
          contain at least one key

          [default: ./deploy/user_keys/]

      --admin-keys-directory <DIRECTORY>
          Directory containing public keys of admin users. Each file must contain
          at least one key

          [default: ./deploy/admin_keys/]

      --certificates-directory <DIRECTORY>
          Directory containing SSL certificates and keys. Each sub-directory
          inside of this one must contain a certificate chain in a fullchain.pem
          file and its private key in a privkey.pem file

          [default: ./deploy/certificates/]

      --acme-cache-directory <DIRECTORY>
          Directory to use as a cache for Let's Encrypt's account and
          certificates. This will automatically be created for you.

          Note that this setting ignores the --disable-directory-creation flag.

          [default: ./deploy/acme_cache/]

      --private-key-file <FILE>
          File path to the server's secret key. If missing, it will be
          created for you

          [default: ./deploy/server_keys/ssh]

      --disable-directory-creation
          If set, disables automatic creation of the directories expected by the
          application. This may result in application errors if the directories
          are missing

      --listen-address <ADDRESS>
          Address to listen for all client connections

          [default: ::]

      --ssh-port <PORT>
          Port to listen for SSH connections

          [default: 2222]

      --http-port <PORT>
          Port to listen for HTTP connections

          [default: 80]

      --https-port <PORT>
          Port to listen for HTTPS connections

          [default: 443]

      --connect-ssh-on-https-port
          Allow connecting to SSH via the HTTPS port as well. This can be useful
          in networks that block binding to other ports

      --force-https
          Always redirect HTTP requests to HTTPS

      --disable-http-logs
          Disable sending HTTP logs to clients

      --disable-tcp-logs
          Disable sending TCP/proxy logs to clients

      --acme-contact-email <EMAIL>
          Contact e-mail to use with Let's Encrypt. If set, enables ACME for
          HTTPS certificates.

          By providing your e-mail, you agree to the Let's Encrypt Subscriber
          Agreement.

      --acme-use-staging
          Controls whether to use the staging directory for Let's Encrypt
          certificates (default is production). Only set this option for testing

      --password-authentication-url <URL>
          If set, defines a URL which password authentication requests will be
          validated against. This is done by sending the following JSON payload
          via a POST request:

          {"user": "...", "password": "...", "remote_address": "..."}

          Any 2xx response indicates that the credentials are authorized.

      --bind-hostnames <POLICY>
          Policy on whether to allow binding specific hostnames.

          Beware that this can lead to domain takeovers if misused!

          Possible values:
          - all:   Allow any hostnames unconditionally, including the
                   main domain
          - cname: Allow any hostnames with a CNAME record pointing to
                   the main domain
          - txt:   Allow any hostnames with a TXT record containing a
                   fingerprint, including the main domain
          - none:  Don't allow user-provided hostnames, enforce
                   subdomains

          [default: txt]

      --load-balancing <STRATEGY>
          Strategy for load-balancing when multiple services request the same
          hostname/port.

          By default, traffic towards matching hostnames/ports will be
          load-balanced.

          Possible values:
          - allow:   Load-balance with all available handlers
          - replace: Don't load-balance; When adding a new handler,
                     replace the existing one
          - deny:    Don't load-balance; Deny the new handler if
                     there's an existing one

          [default: allow]

      --load-balancing-algorithm <ALGORITHM>
          Algorithm to use for service selection when load-balancing.

          By default, traffic will be randomly distributed between services.

          Possible values:
          - random:      Choose randomly
          - round-robin: Round robin
          - ip-hash:     Choose based on IP hash

          [default: random]

      --txt-record-prefix <PREFIX>
          Prefix for TXT DNS records containing key fingerprints, for
          authorization to bind under a specific domain.

          In other words, valid records will be of the form:

          TXT <PREFIX>.<DOMAIN> SHA256:...

          [default: _sandhole]

      --allow-requested-subdomains
          Allow user-requested subdomains. By default, subdomains are always
          random

      --allow-requested-ports
          Allow user-requested ports. By default, ports are always random

      --authenticate-any-key-as-user
          Any non-admin key that authenticates will have user privileges,
          being able to forward services. This effectively turns Sandhole
          into a public reverse proxy.

          ANYONE that can reach your server's SSH port will be able to
          create new keys and proxy services under your instance. Be sure
          that you know what you're doing before enabling this option.

      --disable-http
          Disable all HTTP tunneling. By default, this is enabled globally

      --disable-https
          Disable all HTTPS tunneling. By default, this is enabled globally

      --disable-sni
          Disable SNI proxy tunneling. By default, this is enabled globally

      --disable-tcp
          Disable all TCP port tunneling except HTTP. By default, this is
          enabled globally

      --disable-aliasing
          Disable all aliasing (i.e. local forwarding). By default, this is
          enabled globally

      --disable-prometheus
          Disable the admin-only alias for the Prometheus exporter. By default,
          it is enabled

      --quota-per-user <MAX>
          How many services can be exposed for a single user at once. Doesn't
          apply to admin users.

          Each user is distinguished by their key fingerprint or, in the case of
          API logins, by their username.

          By default, no limit is set.

      --rate-limit-per-user <RATE>
          How many bytes per second a single user's services can transmit at
          once. Doesn't apply to admin users.

          Each user is distinguished by their key fingerprint or, in the case of
          API logins, by their username.

          By default, no rate limit is set. For better results, this should be a
          multiple of `--buffer-size`.

      --random-subdomain-value <VALUE>
          Set a U64 value for random subdomains for use in conjunction with
          `--random-subdomain-seed` to allow binding to the same random address
          between Sandhole restarts.

          Beware that this can lead to collisions if misused!

          If this and `--random-subdomain-value-file` are unset, defaults to a
          random value.

      --random-subdomain-value-file <FILE>
          Set a file containing a U64 value for random subdomains for use in
          conjunction with `--random-subdomain-seed` to allow binding to the
          same random address between Sandhole restarts.

          Beware that this can lead to collisions if misused!

          If this and `--random-subdomain-value` are unset, defaults to a random
          value.

          This option takes priority over `--random-subdomain-value`.

      --random-subdomain-seed <SEED>
          Which value to seed with when generating random subdomains, for
          determinism. This allows binding to the same random address until
          Sandhole is restarted.

          Beware that this can lead to collisions if misused!

          If unset, defaults to a random seed.

          Possible values:
          - ip-and-user: From IP address, SSH user, and requested address.
                         Recommended if unsure
          - user:        From SSH user and requested address
          - fingerprint: From SSH user, key fingerprint, and requested
                         address
          - address:     From SSH connection socket (address + port) and
                         requested address

      --random-subdomain-length <LENGTH>
          The length of the string appended to the start of random subdomains

          [default: 6]

      --random-subdomain-filter-profanities
          Prevents random subdomains from containing profanities

      --requested-domain-filter-profanities
          Prevents user-requested domains from containing profanities.

          Beware that this can lead to false positives being blocked!

      --requested-subdomain-filter-profanities
          Prevents user-requested subdomains from containing profanities.

          Beware that this can lead to false positives being blocked!

      --log-format <FORMAT>
          Which format to output logs in

          Possible values:
          - default: Default (compact, ANSI-formatted, single-line)
          - json:    JSON format
          - duper:   Duper format

          [default: default]

      --ip-allowlist <CIDR>
          Comma-separated list of IP networks to allow. Setting this will block
          unknown IPs from connecting

      --ip-blocklist <CIDR>
          Comma-separated list of IP networks to block. Setting this will allow
          unknown IPs to connect, unless --ip-allowlist is set

      --buffer-size <SIZE>
          Size to use for bidirectional buffers.

          A higher value will lead to higher memory consumption.

          [default: 32768B]

      --pool-size <SIZE>
          Maximum pool size for simultaneous connections per proxied service.
          The maximum is 536870911.

          A high value may cause disruption on services, while a low value may
          lead to denial-of-service.

          [default: 65536]

      --pool-timeout <DURATION>
          How long to wait for a connection to be available in the pool before
          being timed out.

          By default, connections are immediately timed out when the pool is
          exhausted.

      --http-pool-size <SIZE>
          Maximum size for each HTTP connection pool (per unique client).

          Controls how many keep-alive HTTP connections are cached per unique
          client. Lower values reduce memory usage, higher values improve
          performance.

          [default: 16]

      --http-pool-max-idle-time <DURATION>
          Maximum idle time for HTTP pooled connections.

          Connections idle longer than this will be evicted from the pool.

          [default: 60s]

      --http-pool-max-reuse <COUNT>
          Maximum number of times an HTTP connection can be reused.

          Prevents connections with accumulated state from persisting
          indefinitely.

          [default: 1000]

      --max-simultaneous-connections-per-ip <SIZE>
          Maximum number of simultaneous connections per IP to a proxied
          service. The maximum is 65535.

          A low value may lead to client side disruptions, while a high value
          may lead to denial-of-service.

          [default: 64]

      --channel-open-timeout <DURATION>
          How long to wait for SSH clients to confirm a forwarded channel open

          [default: 15s]

      --ssh-keepalive-interval <DURATION>
          How long to wait between each keepalive message that is sent to an
          unresponsive SSH connection

          [default: 15s]

      --ssh-keepalive-max <VALUE>
          How many keepalive messages are sent to an unresponsive SSH connection
          before it is dropped.

          A value of zero disables timeouts.

          The timeout is equal to this value plus one, times
          `--ssh-keepalive-interval`.

          [default: 3]

      --directory-poll-interval <DURATION>
          How long to poll certificates and keys directories for new changes.

          A low value may consume too many resources on large file trees.

          [default: 15s]

      --idle-connection-timeout <DURATION>
          Grace period for dangling/unauthenticated connections before they are
          forcefully disconnected.

          A low value may cause valid connections to be erroneously removed.

          [default: 2s]

      --unproxied-connection-timeout <DURATION>
          Grace period for unauthenticated SSH connections after closing the
          last proxy tunnel before they are forcefully disconnected.

          A low value may cause valid proxy/tunnel connections to be erroneously
          removed.

          If unset, this defaults to the value set by --idle-connection-timeout

      --authentication-request-timeout <DURATION>
          Time until a user+password authentication request is canceled. Any
          timed out requests will not authenticate the user

          [default: 5s]

      --http-request-timeout <DURATION>
          Time until an outgoing HTTP request is automatically canceled.

          By default, outgoing requests are not terminated by Sandhole.

      --tcp-connection-timeout <DURATION>
          How long until TCP connections (including Websockets and local
          forwardings) are automatically garbage-collected.

          By default, these connections are not terminated by Sandhole.

      --disable-tcp-keepalive
          Disable TCP keepalive on SSH, HTTP, HTTPS and TCP connections.
          By default, it is enabled.

          Disabling TCP keepalive may lead to "connection reset by peer"
          errors on socket reuse.

      --tcp-keepalive-time <DURATION>
          Time to send the first TCP keepalive probe after the set idle time.

          Only applies when `--disable-tcp-keepalive` is unset.

          [default: 20s]

      --tcp-keepalive-interval <DURATION>
          Interval between TCP keepalive probes once `--tcp-keepalive-time`
          has elapsed.

          Only applies when `--disable-tcp-keepalive` is unset.

          [default: 10s]

      --udp-timeout <DURATION>
          How long until SSH channels from UDP sockets are automatically
          garbage-collected

          [default: 60s]

  -h, --help
          Print help (see a summary with '-h')

  -V, --version
          Print version
NixOS module options
services.sandhole.enable
Whether to enable Sandhole, a reverse proxy that lets you expose HTTP/SSH/TCP services through SSH port forwarding.
Type: boolean
Default:
false
Example:
true
services.sandhole.package
The sandhole package to use.
Type: package
Default:
pkgs.sandhole
services.sandhole.group
Group to run Sandhole as.
Type: string
Default:
"sandhole"
services.sandhole.openFirewall
Whether to automatically open the necessary ports in the firewall.
Warning: If this option is true and services.sandhole.settings.disable-tcp is false or unset,
all unprivileged TCP ports (i.e. >= 1024) will be opened.
Type: boolean
Default:
false
Example:
true
services.sandhole.settings
Attribute set of command line options for Sandhole, without the leading hyphens.
If Sandhole is enabled, then either services.sandhole.settings.domain or services.sandhole.settings.no-domain must be set.
Note: For all available settings, see the Sandhole documentation.
Type: open submodule of attribute set of (null or boolean or (unsigned integer, meaning >=0) or absolute path or string)
Default:
{ }
Example:
{
  domain = "sandhole.com.br";
  acme-contact-email = "admin@sandhole.com.br";
  connect-ssh-on-https-port = true;
  load-balancing = "replace";
  allow-requested-subdomains = true;
  allow-requested-ports = true;
  random-subdomain-filter-profanities = true;
  force-https = true;
  directory-poll-interval = "10s";
  pool-size = 1024;
  pool-timeout = "10s";
}
services.sandhole.settings.disable-http
Disable all HTTP tunneling. By default, this is enabled globally.
Type: boolean
Default:
false
Example:
true
services.sandhole.settings.disable-https
Disable all HTTPS tunneling. By default, this is enabled globally.
Type: boolean
Default:
false
Example:
true
services.sandhole.settings.disable-tcp
Disable all TCP port tunneling except HTTP. By default, this is enabled globally.
Warning: If this option is false or unset and services.sandhole.openFirewall is true,
all unprivileged TCP ports (i.e. >= 1024) will be opened.
Type: boolean
Default:
false
Example:
true
services.sandhole.settings.domain
The root domain of the application.
Type: null or string
Default:
null
Example:
"nixos.org"
services.sandhole.settings.http-port
Port to listen for HTTP connections.
Type: 16 bit unsigned integer; between 0 and 65535 (both inclusive)
Default:
80
services.sandhole.settings.https-port
Port to listen for HTTPS connections.
Type: 16 bit unsigned integer; between 0 and 65535 (both inclusive)
Default:
443
services.sandhole.settings.no-domain
Whether to run Sandhole without a root domain.
This option disables subdomains.
Type: boolean
Default:
false
Example:
true
services.sandhole.settings.ssh-port
Port to listen for SSH connections.
Type: 16 bit unsigned integer; between 0 and 65535 (both inclusive)
Default:
2222
Example:
22
services.sandhole.user
User to run Sandhole as.
Type: string
Default:
"sandhole"
Benchmarks
This page includes some benchmarks comparing Sandhole and competing solutions.
Methodology
- Test service: sandhole-benchmark/service in release profile, using the given ciphers, running on the same machine as the proxy.
- Test client: sandhole-benchmark/measure in release profile, running on the same machine as the proxy.
- Measurements: Seven runs in sequence, then average of five best results.
Results
| aes256-gcm | sandhole v0.10.2 | sish v2.23.0 | Speedup |
|---|---|---|---|
| HTTPS GET 50MB | 114.6ms | 114.0ms | 0.995x |
| HTTPS GET 100MB | 194.6ms | 190.4ms | 0.978x |
| HTTPS POST 50MB | 127.0ms | 133.0ms | 1.047x |
| HTTPS POST 100MB | 214.2ms | 233.6ms | 1.091x |
| chacha20-poly1305 | sandhole v0.10.2 | sish v2.23.0 | Speedup |
|---|---|---|---|
| HTTPS GET 50MB | 110.0ms | 144.2ms | 1.311x |
| HTTPS GET 100MB | 189.2ms | 248.0ms | 1.311x |
| HTTPS POST 50MB | 145.6ms | 159.0ms | 1.092x |
| HTTPS POST 100MB | 235.6ms | 274.6ms | 1.166x |